
Complete Manual for Facial Detection Implementation
Estimated time: 30-45 minutes for complete configuration
What will you learn from this manual?
The manual will teach you how to implement and use the web component @ jaak.ai / visage for real-time facial detection from scratch. No advanced technical skills required - Just follow the steps.
Vivo demand
Before you start with implementation, you can test the functioning component:
What can you do about the demo?
- Test real-time facial detection
- See component performance
- Check compatibility with your device
- Do real-time debug
Before Start - Checks list
Be sure to have these elements ready:
- Node.js 16.0 + installed (for npm projects)
- Modern navigation (Chrome 88 +, Firefox 85 +, Safari 14 +)
- HTTPS connection (required for camera access)
- Code Editor
- Access to functional web camera
Contents Index
| Section | What will you do? | Time |
|---|---|---|
| Step 1 | Install and configure component | 5 min |
| Step 2 | Basic HTML implementation | 15 min |
| Step 3 | Configure correct events | 10 min |
| Step 4 | Implement into frameworks | 10 min |
| Step 5 | Test operation | 5 min |
Step 1: Install and Configure component
Objective
Install the component @ jaak.ai / visage and configure the environment.
Installation methods
1.1 Installation using NPM (Recommended)
npm install @jaak.ai/visage
1.2 Installation using CDN
<script type="module" src="https://unpkg.com/@jaak.ai/visage/dist/jaak-visage-webcomponent/jaak-visage-webcomponent.esm.js"></script>
1.3 Technical requirements
| Requirement | Version | Mandatory? |
|---|---|---|
| Navigation | Chrome 88 +, Firefox 85 +, Safari 14 + | Yes |
| HTTPS | Safe protocol | Yes (production) |
| JavaScript | ES2017 + | Yes |
Step 2: Basic HTML implementation
Objective
Create your first functional component implementation.
2.1 HTML Funcional complete
<!DOCTYPE html>
<html dir="ltr" lang="es">
<head>
    <meta charset="utf-8">
    <meta name="viewport" content="width=device-width, initial-scale=1.0">
    <title>JAAK Visage - Detección Facial</title>

    <script type="module" src="https://unpkg.com/@jaak.ai/visage/dist/jaak-visage-webcomponent/jaak-visage-webcomponent.esm.js"></script>

    <style>
        body {
            font-family: Arial, sans-serif;
            max-width: 800px;
            margin: 0 auto;
            padding: 20px;
        }

        .status {
            padding: 15px;
            margin: 10px 0;
            border-radius: 8px;
            background: #e3f2fd;
        }

        .status.success { background: #e8f5e8; }
        .status.error { background: #ffebee; }

        .controls {
            margin: 20px 0;
            display: flex;
            gap: 10px;
            flex-wrap: wrap;
        }

        button {
            padding: 12px 24px;
            border: none;
            border-radius: 6px;
            background: #2196f3;
            color: white;
            cursor: pointer;
        }

        button:disabled {
            background: #ccc;
            cursor: not-allowed;
        }

        jaak-visage {
            width: 100%;
            max-width: 640px;
            display: block;
            margin: 20px auto;
            border-radius: 10px;
            overflow: hidden;
        }
    </style>
</head>
<body>
    <div class="container">
        <h1>Detector Facial JAAK Visage</h1>

        <div class="status" id="statusDiv">
            <strong>Estado:</strong> <span id="statusText">Inicializando...</span>
        </div>

        <div class="controls">
            <button id="startBtn" disabled>Iniciar</button>
            <button id="stopBtn" disabled>Detener</button>
            <button id="helpBtn" disabled>Ayuda</button>
        </div>

        <jaak-visage
            id="faceDetector"
            debug="true"
            camera="auto">
        </jaak-visage>

        <div id="results" style="display: none;">
            <h3>Resultados</h3>
            <div id="captureData"></div>
        </div>
    </div>

    <script>
        // Variables globales
        let jaakVisage = null;
        let isComponentReady = false;

        // Initiate component correctly
        async function initializeJaakVisage() {
            // Important: To wait for the component to be defined
            await customElements.whenDefined('jaak-visage');

            jaakVisage = document.getElementById('faceDetector');

            jaakVisage.addEventListener('statusUpdated', handleStatusUpdated);
            jaakVisage.addEventListener('captureCompleted', handleCaptureCompleted);
            jaakVisage.addEventListener('error', handleError);
        }

        // Correct driver for statusUpdated
        function handleStatusUpdated(event) {
            const { status, message } = event.detail;
            console.log('Status actualizado:', status, message);

            if (status === 'ready' || status === 'inactive') {
                isComponentReady = true;
            } else if (status === 'active') {
                console.log('Detector activo');
            } else if (status === 'error') {
                console.error('Error:', message);
            }
        }

        function handleCaptureCompleted(event) {
            const data = event.detail;
            console.log('Capture completed:', data);
        }

        function handleError(event) {
            const error = event.detail;
            console.error(`Error: ${error.message || 'Unknown error'}`);
        }

        async function handleStart() {
            await jaakVisage.start();
        }

        async function handleStop() {
            await jaakVisage.stop();
        }

        async function handleShowHelp() {
            await jaakVisage.showHelp();
        }

        window.addEventListener('load', initializeJaakVisage);
    </script>
</body>
</html>
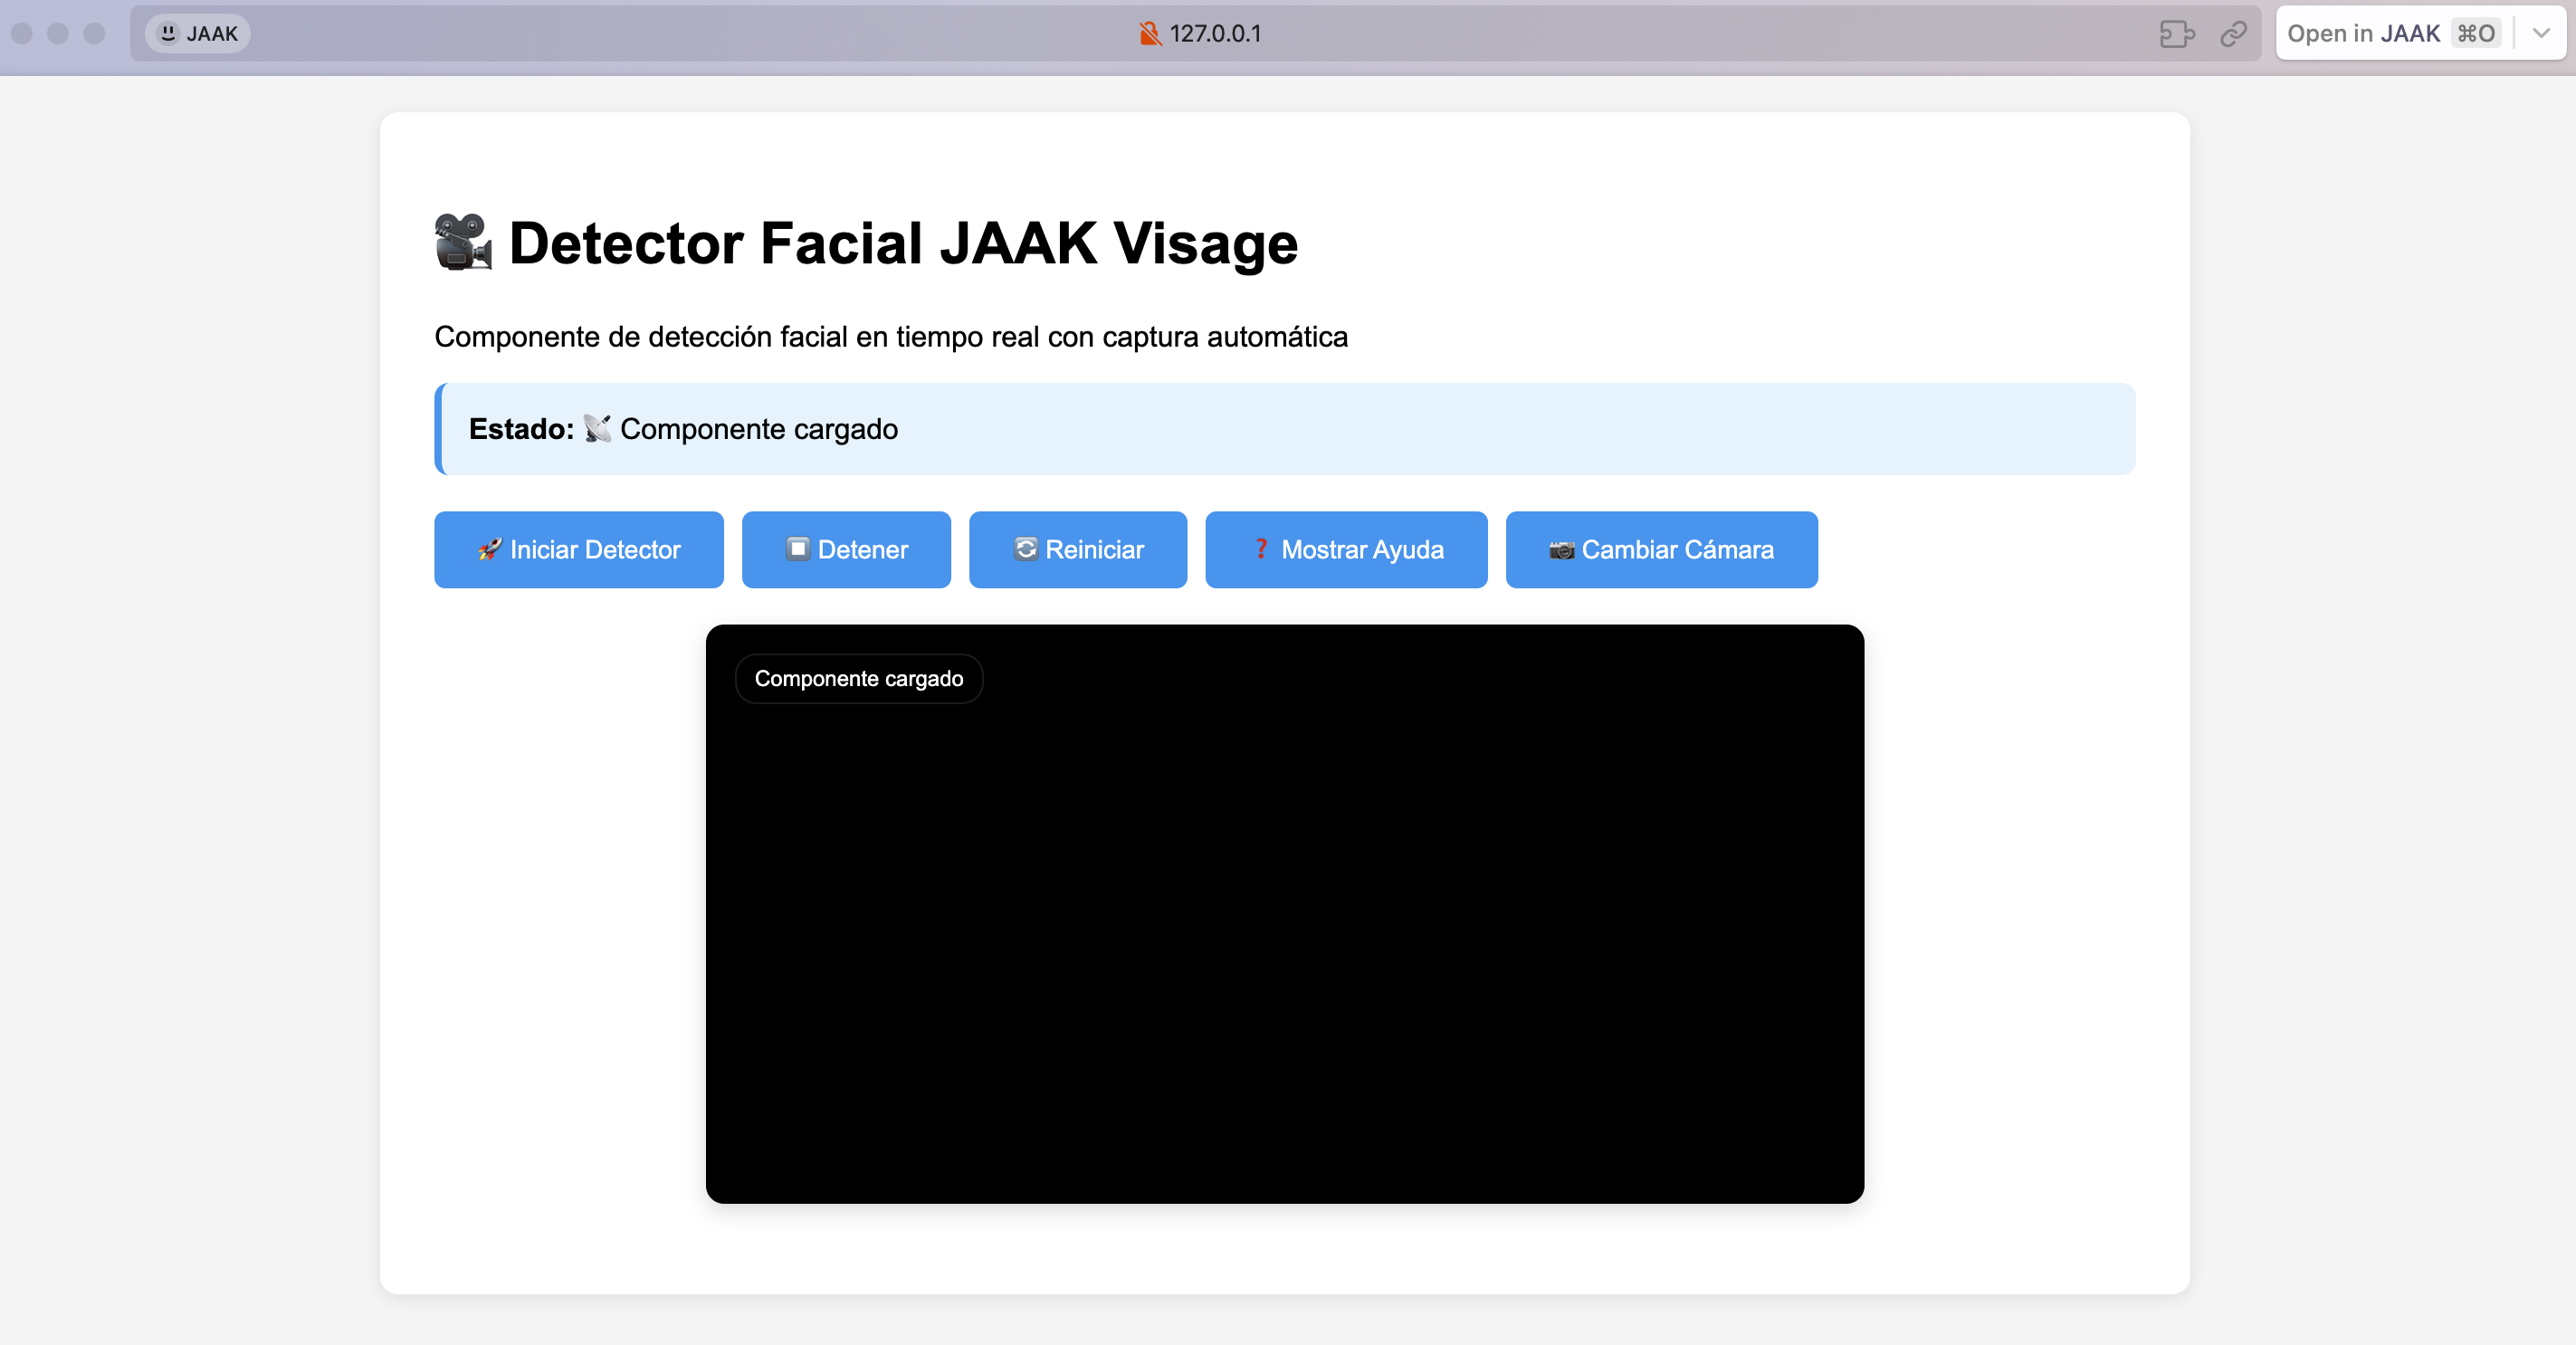
When renderizing you have to have an HTML page as follows:
Passage 3: Configure Closed Events
Objective
To properly configure the actual events that emits the component.
Real component events
3.1 Main event: StatusUpdated
jaakVisage.addEventListener('statusUpdated', (event) => {
    const { status, message } = event.detail;

    // Estados posibles:
    switch(status) {
        case 'ready':
        case 'inactive':
            // ready to use component
            enableControls();
            break;
        case 'active':
            // Detector funcionando
            showActiveState();
            break;
        case 'error':
            // Misconduct
            showError(message);
            break;
    }
});
3.2 Other events available
// Capture completed
jaakVisage.addEventListener('captureCompleted', (event) => {
    const data = event.detail;
});

// Mistakes
jaakVisage.addEventListener('error', (event) => {
    const error = event.detail;
    console.error('Error:', error.message);
});
3.3 Corrected initiation
async function initializeComponent() {
    // Important: To wait for the component to be defined
    await customElements.whenDefined('jaak-visage');

    const jaakVisage = document.querySelector('jaak-visage');

    // Now it's safe to add event listeners
    jaakVisage.addEventListener('statusUpdated', handleStatusUpdated);
}
Step 4: Implement with Frameworks
React
import React, { useRef, useEffect, useState } from 'react';
import { defineCustomElements } from '@jaak.ai/visage/loader';

defineCustomElements();

const FaceDetector = () => {
    const jaakVisageRef = useRef(null);
    const [isReady, setIsReady] = useState(false);
    const [capturedData, setCapturedData] = useState(null);

    useEffect(() => {
        const initComponent = async () => {
            // To wait till it's defined
            await customElements.whenDefined('jaak-visage');
            const component = jaakVisageRef.current;

            component.addEventListener('statusUpdated', (event) => {
                const { status } = event.detail;
                if (status === 'ready' || status === 'inactive') {
                    setIsReady(true);
                }
            });

            component.addEventListener('captureCompleted', (event) => {
                setCapturedData(event.detail);
            });
        };

        initComponent();
    }, []);

    const handleStart = async () => {
        try {
            await jaakVisageRef.current.start();
        } catch (error) {
            console.error('Error:', error);
        }
    };

    return (
        <div>
            <h2>Detector Facial React</h2>

            <button onClick={handleStart} disabled={!isReady}>
                Iniciar
            </button>

            <jaak-visage
                ref={jaakVisageRef}
                debug="false"
                camera="auto">
            </jaak-visage>

            {capturedData && (
                <div>
                    <h3>Resultado</h3>
                    <img src={capturedData.imageData} alt="Capture" />
                </div>
            )}
        </div>
    );
};

export default FaceDetector;
Angular
// Component
import { Component, ElementRef, ViewChild, AfterViewInit } from '@angular/core';
import { defineCustomElements } from '@jaak.ai/visage/loader';

defineCustomElements();

@Component({
    selector: 'app-face-detector',
    template: `
        <div>
            <h2>Detector Facial Angular</h2>

            <button (click)="start()" [disabled]="!isReady">
                Iniciar
            </button>

            <jaak-visage #jaakVisage debug="false" camera="auto">
            </jaak-visage>

            <div *ngIf="capturedData">
                <h3>Resultado</h3>
                <img [src]="capturedData.imageData" alt="Capture">
            </div>
        </div>
    `,
    schemas: [CUSTOM_ELEMENTS_SCHEMA]
})
export class FaceDetectorComponent implements AfterViewInit {
    @ViewChild('jaakVisage') jaakVisage!: ElementRef;

    isReady = false;
    capturedData: any = null;

    async ngAfterViewInit() {
        // To wait till it's defined
        await customElements.whenDefined('jaak-visage');

        const component = this.jaakVisage.nativeElement;

        component.addEventListener('statusUpdated', (event: any) => {
            const { status } = event.detail;
            if (status === 'ready' || status === 'inactive') {
                this.isReady = true;
            }
        });

        component.addEventListener('captureCompleted', (event: any) => {
            this.capturedData = event.detail;
        });
    }

    async start() {
        try {
            await this.jaakVisage.nativeElement.start();
        } catch (error) {
            console.error('Error:', error);
        }
    }
}
Step 5: Configure Local Server and Test
Objective
Configure a local server with HTTPS to test the face detection component correctly as browsers require HTTPS to gain access to the camera.
Methods to Lift Local Server
5.1 Option 1: Simple HTTP Server with Python (For development)
# Si tienes Python 3 instalado
python -m http.server 8000

# Or Python 2
python -m SimpleHTTPServer 8000
Then get to: http://localhost:8000
Important
This option works only at localhost for development. To production you require HTTPS.
5.2 Option 2: HTTPS with Live Server (VS Code)
- Install Live Server extension in VS Code
- Configure HTTPS at settings.json:
{
    "liveServer.settings.https": {
        "enable": true,
        "cert": "",
        "key": "",
        "passphrase": ""
    }
}
- Right click on HTML file, select "Open with Live Server"
5.3 Option 3: HTTPS server with http-server (Node.js)
# Instalar http-server globalmente
npm install -g http-server

# Generate autosigned certificates (development only)
openssl req -newkey rsa:2048 -new -nodes -x509 -days 3650 -keyout key.pem -out cert.pem

# Levantar servidor HTTPS
http-server -S -C cert.pem -K key.pem -p 8443

# Acceder a: https://localhost:8443
5.4 Option 4: Vite Server (Recommended)
# Create basic package.json
npm init -y

# Instalar Vite
npm install --save-dev vite

# Ejecutar servidor
npm run dev
Steps to Test
Step 1: Prepare file
- Copy the complete HTML code from Step 2 in a file called
index.html - Keep it in an empty folder
Step 2: Lift server
- Open terminal in folder where you saved
index.html - Implement one of the above methods
- Accept autosigned certificate if safety warning appears
Step 3: Test functionality
- Open server URL to your browser
- Accept camera permits as requested
- Click on "Start" button to start detection
- Check that component works properly
checklist
| Element | State | Description |
|---|---|---|
| HTTPS Server | ☐ | Server running with SSL certificate |
| Loading component | ☐ | Element appears in DOM |
| Event statusUpdated | ☐ | That's right. |
| Camera permits | ☐ | Sailor requests permission |
| Facial detection | ☐ | Detects and captures faces |
Rapid Command (A line)
# To quickly test (requires Node.js)
npx http-server -S -C <(openssl req -newkey rsa:2048 -new -nodes -x509 -days 1 -keyout /dev/stdout -out /dev/stdout -subj "/CN=localhost" 2>/dev/null) -p 8443
Debug and Troublehooting
Check events
// Intercept all component events
const jaakVisage = document.querySelector('jaak-visage');
const originalDispatchEvent = jaakVisage.dispatchEvent.bind(jaakVisage);

jaakVisage.dispatchEvent = function(event) {
    console.log('Evento:', event.type, event.detail);
    return originalDispatchEvent(event);
};
Common challenges
| Problem | Resolution |
|---|---|
| Events aren't fired | Use await customElements.whenDefined('jaak-visage') |
| IsReady doesn't work. | Switch to statusUpdated |
| Camera doesn't work | Check HTTPS and permissions |
Reference
Main methods
| Method | Description | Example |
|---|---|---|
| start () | Initiates the detector | await jaakVisage.start() |
| stop () | Stops the detector | await jaakVisage.stop() |
| showHelp () | Sample help | await jaakVisage.showHelp() |
Events
| Event | Data (event.details) | When to shoot |
|---|---|---|
| statusUpdated | {status, message} | Restatus of component |
| completed | {timestamp, confidence, imageData} | Successful capture |
| error | {message, code?} | Operating error |
Properties
| Property | Type | Deffect | Example |
|---|---|---|---|
| debug | boolean | Fasse | debug="true" |
| Camera | string | "car" | camera="front" |
Problem solving
Common
The component does not respond
// Resolution: To expect definition
async function fixComponentIssue() {
    await customElements.whenDefined('jaak-visage');
    // Now it's secure to use the component
}
Events Don't Work
// Incorrecto
jaakVisage.addEventListener('isReady', handler); // That event doesn't exist.

// Correcto
jaakVisage.addEventListener('statusUpdated', (event) => {
    const { status } = event.detail;
    if (status === 'ready') {
        // Retiring component
    }
});
Camera isn't activated
| Cause | Resolution |
|---|---|
| HTTP production | Using HTTPS |
| Closed permits | Check browser settings |
| Occupied chamber | Close other applications |
Do you need some help?
Support information
- Problem description: What are you trying to do with what's going on?
- Relevant code: Implementation fragments
- Browser console: Mistakes Screenshots
- Environment: Browser, version, device
Advanced Debug
// Reg tools
function enableDebugMode() {
    const jaakVisage = document.querySelector('jaak-visage');

    // Habilitar logs
    jaakVisage.setAttribute('debug', 'true');

    // Interceptar eventos
    const events = ['statusUpdated', 'captureCompleted', 'error'];
    events.forEach(eventName => {
        jaakVisage.addEventListener(eventName, (event) => {
            console.log(`[${eventName}]:`, event.detail);
        });
    });

    // System information
    console.log('UserAgent:', navigator.userAgent);
    console.log('MediaDevices:', 'mediaDevices' in navigator);
    console.log('WebComponents:', 'customElements' in window);
}

enableDebugMode();
You have successfully implemented the facial detection component JAAK Visage with the right event and best practice configuration.